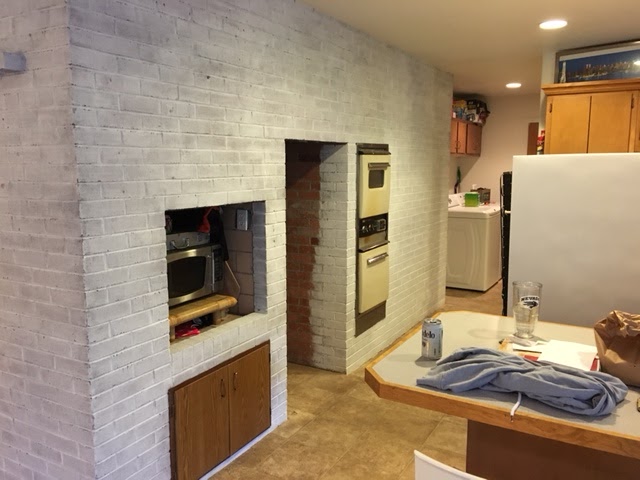
I had done some research and decided that we should try whitewashing it. After talking to our contractor about it, we decided that it was a project that Rory and I could complete ourselves and save some money on our kitchen remodel.
The process seemed pretty easy from my research and it was exactly that. Pretty easy.
What You Need:
Paint Brush(es)
Large Sponge
White Paint (Behr Premium Plus Ultra)
Paint Cup/Bucket
Painters Tape
Drop Cloth/Painters Paper
Cheesecloth/Clean Rag
Step Stool (optional)
Process:
Since we were replacing our flooring in our kitchen, we were not too concerned with the floors getting paint on them. We did put down some painters paper with tape and then put a drop cloth over that. We took out our refrigerator and put painters paper around our microwave.
We also spent the day before filling in the holes from the previous owners and some of our own. Lowes recommended that we put a cement caulk in the holes and then put grinded brick flakes on top of that. I didn't have much to do with this process, but my husband got it done fairly quickly.
Once we were ready to paint, I used cheesecloth to wipe down the wall of any excess dust or spider webs.
Before
From there, we started painting strokes left to right, right to left. Be sure to have a sponge on hand as you will want to wipe the excess paint drips. You will want to move quickly as the paint will dry pretty fast. You will also want to make sure you got the grouted areas. Sometimes you need to paint the grouted areas as swiping the brush back and forth will miss those areas.
We finished the first coat in about an hour and a half.
After 1st coat
We loved the look after the first coat, but felt like we wanted to cover a little more of the red brick to match our proposed renovations. We waited for about 30 minutes in between coats to let it dry and make sure we wanted to proceed with another coat.
For the second coat, we used the same half and half mixture, but some say 2/3 water to 1/3 paint. We did add water to the second coat as we went so that the paint mixture stayed watery (but not much). The second coat took about an hour and we were very happy with our results.
2nd coat - much better
As you can see, there is still some red that shows through and it added so much light to the room. We love this wall and our contractor was really impressed with how it turned out.
Cost:
Paint - $33
Large Sponge - $2
Total $35
* We had everything else on hand from other paint projects.
Since we finished the wall, we have our new floors in and the kitchen has been gutted. I can't wait to share the next part of the remodel with you all. Stayed tuned.
I am linking up with Jenn and Jessi.


Wow! What a difference. It looks amazing and pretty easy. I can't wait to see the floors and everythign finished.
ReplyDeleteI love this DIY! Totally transformed things! We have a few houses in the neighborhood next to ours that I comment on all the time, that if they painted the outside brick (like some other houses have done) it would totally update their house. Love this trick!
ReplyDeleteI LOVE it!! It really is funfetti to brighten up your kitchen. Looks great and a fairly easy DIY... which is the best diy!
ReplyDeleteAhh! I LOVE IT!
ReplyDeleteOMG it looks amazing!! You guys did so great! I love it!
ReplyDeleteWow that is so fantastic. It came out so great and really transforms the kitchen.
ReplyDeleteThat came out great!
ReplyDeleteYesss girl I love this!! We did something similar with our fireplace!
ReplyDeleteOh my goodness, girl! This looks amazing! What a difference!! I cannot wait to see more!
ReplyDeleteWhat a fun update! I love it!
ReplyDeleteI'm so happy that you decided to keep the brick wall! I think that it adds so much character to your house! The white wash looks amazing, and I can't wait to see the rest of the kitchen when it's done!
ReplyDeleteMe too. And thank you so much. I love the whitewash and how it brightens the room up so much.
DeleteLooks so good! I love that it makes the kitchen SO much brighter!
ReplyDeleteThat turned out really well!
ReplyDeleteI like your blog a lot. Its informative and full of information. Thank you for sharing.
ReplyDeleteAirless Spray